The last days of Turbo Lister are finally here, and this time eBay means it.
If you're a seller who has a large body of listings stored in Turbo Lister, this can inspire a kind of panic, even if you long ago switched to inkFrog for most of your day-to-day selling.
Turbo Lister has reached the end of it's life. It's time to get that data into inkFrog. Here's how.
Happily, it is possible to move much of your Turbo Lister data and listings to inkFrog. Because Turbo Lister is a very old tool hasn't been supported for a long time, the process is a little more involved than many are accustomed to in 2018—but it's possible.
Here are the steps involved!
1. Export Turbo Lister Data
Your first job is to export listings from Turbo Lister to a CSV file. There are some caveats to understand before you begin:
You can only import up to 250 listings at a time into inkFrog, so it makes sense to process one folder of listings at a time, rather than try to get them all in one go. Repeat these steps for each of your inventory listings folders.
You can only export inventory listings from inkFrog—not active listings. For active listings, the export option is grayed out. Don't worry, this isn't a limitation for you—as an inkFrog user, all of your active listings are already imported into inkFrog for you.
Here are the steps to follow to export listings to a CSV file:
Select a range of listings to export. Open a listings folder, click on the first listing in the folder, then scroll to the bottom of the list, hold down your "Shift" key, and click on the last listing in the folder while still holding the key. You should see all of the listings highlighted.
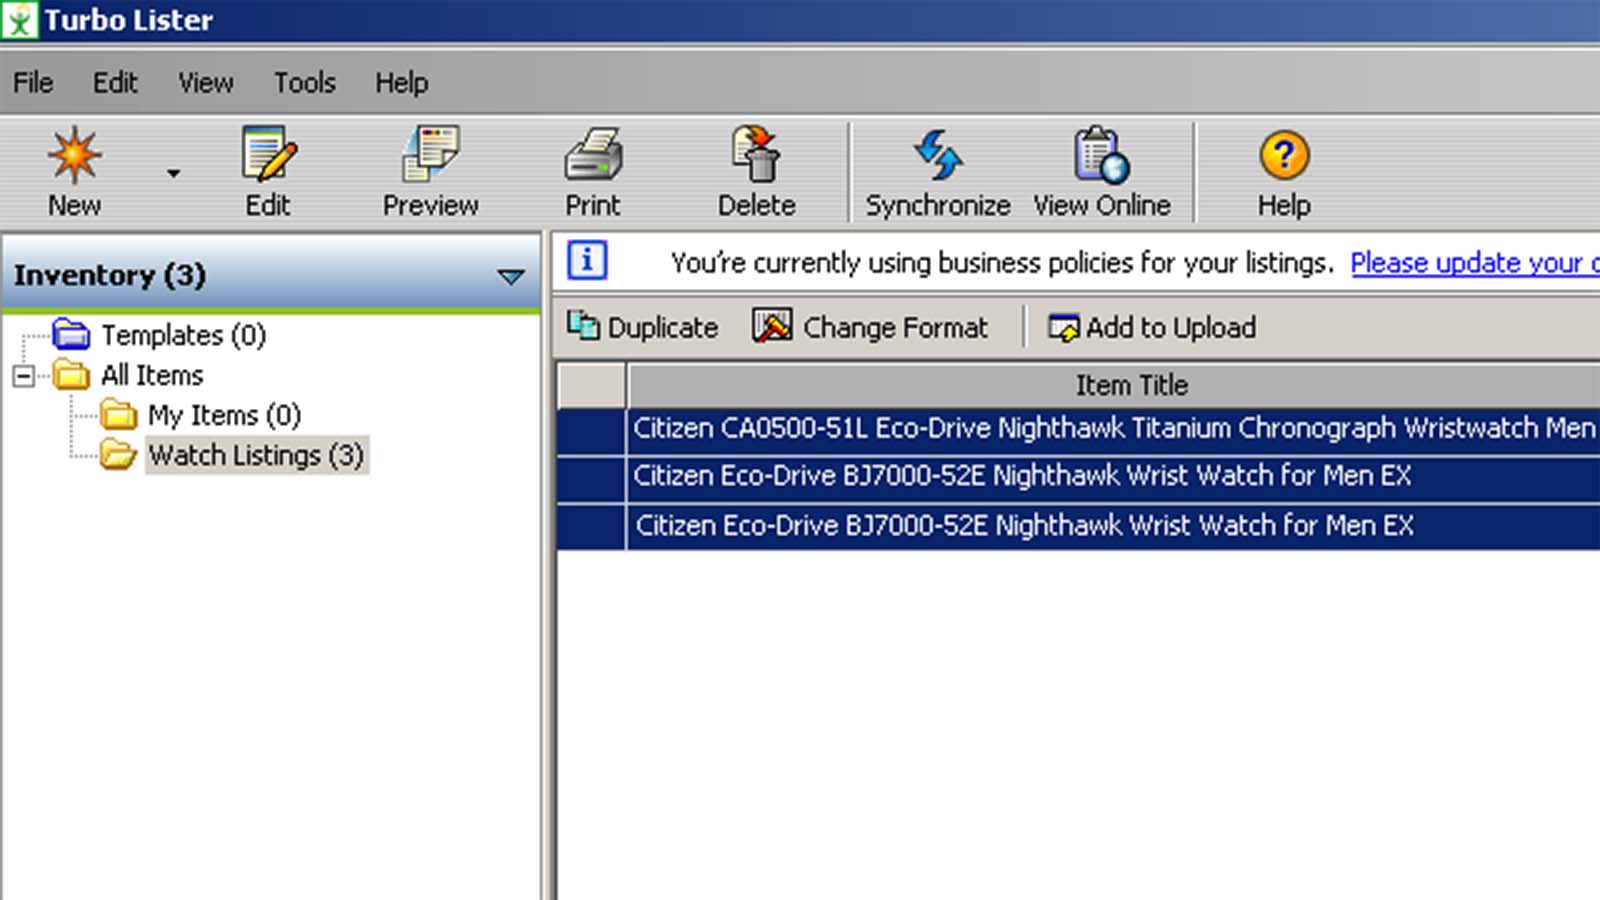
In the "Inventory" area, select a range of Turbo Lister listings to export.
Click "Export Selected Items" in the "File" menu. This step starts the Turbo Lister export tool for the listings you've selected.
Choose the "Turbo Lister Format (CSV file)" option. In the export dialog, select the middle option, which exports your listings to CSV format with as much data as can be preserved. Don't choose the "File Exchange Format" option, as this will omit all listing images.
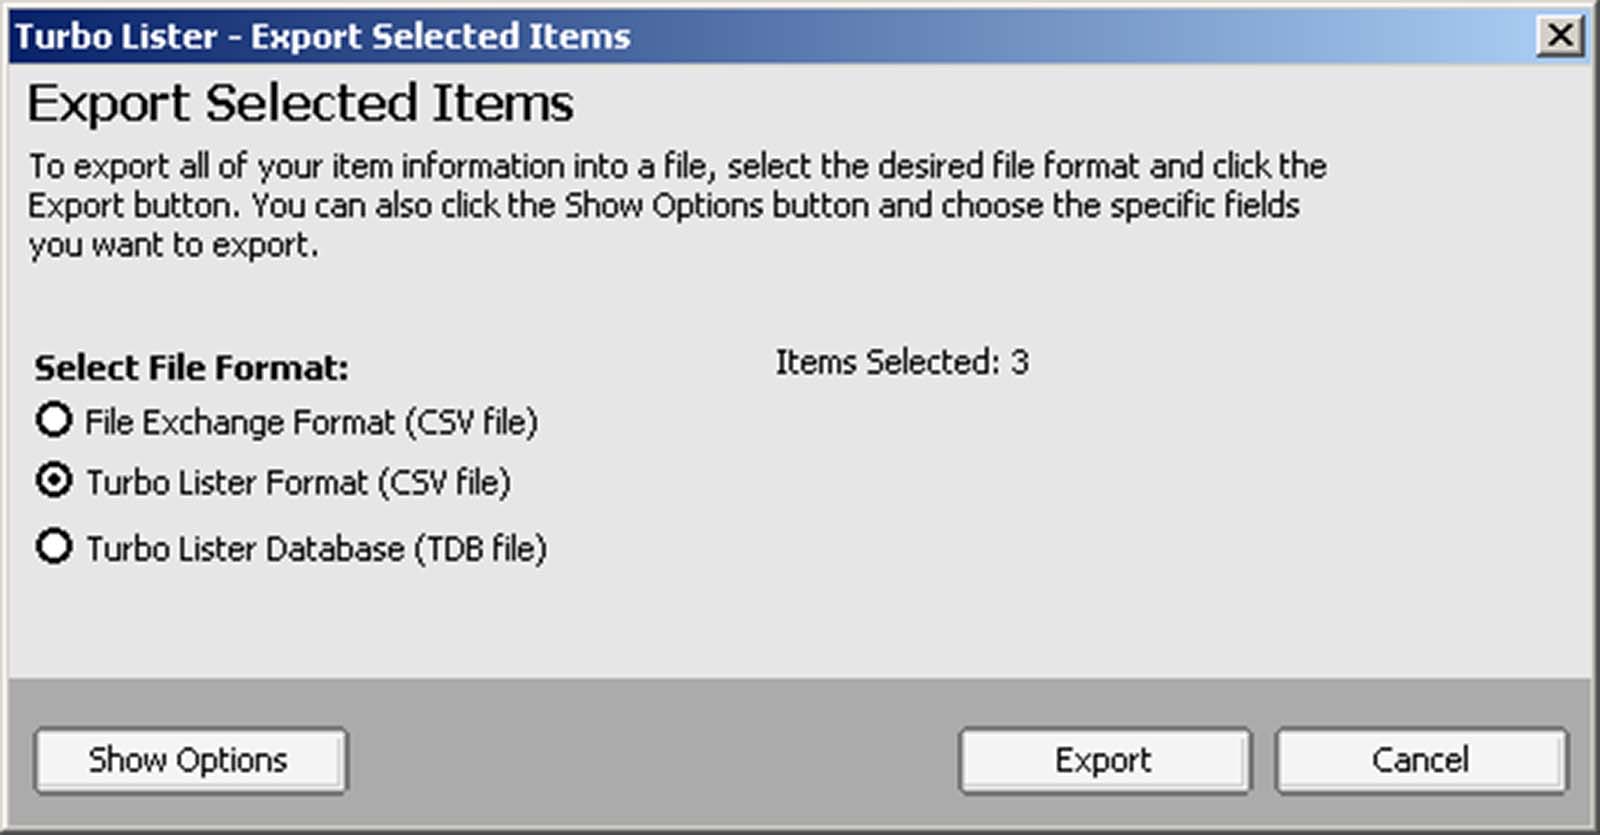
Opt to export in "Turbo Lister Format" and then click "Export" to continue.
Click "Export" to begin the export. After clicking, you'll be asked to provide a location to save your CSV file. Select a location and give it a name, then save it.
Now you have a CSV file containing as much data from the listings you selected as Turbo Lister is able to preserve and export. If necessary, now is the time to move your CSV file to a different computer, if you're now using a newer machine to manage your eBay business.
2. Copy Data to inkFrog's Template
Now for the hardest step in the process—moving data from the Turbo Lister file into inkFrog's CSV template. To complete this job, follow these steps:
Download the inkFrog CSV template. Click here to download a copy of inkFrog's CSV import template. This is the file into which you'll copy Turbo Lister data.
Open the Turbo Lister CSV file in one window, the inkFrog CSV template in another. You'll need to have both files open because you're going to copy and paste between them. Note that the inkFrog template has sample data in it; erase this sample data before you begin and leave just the headers in place in the inkFrog template file.
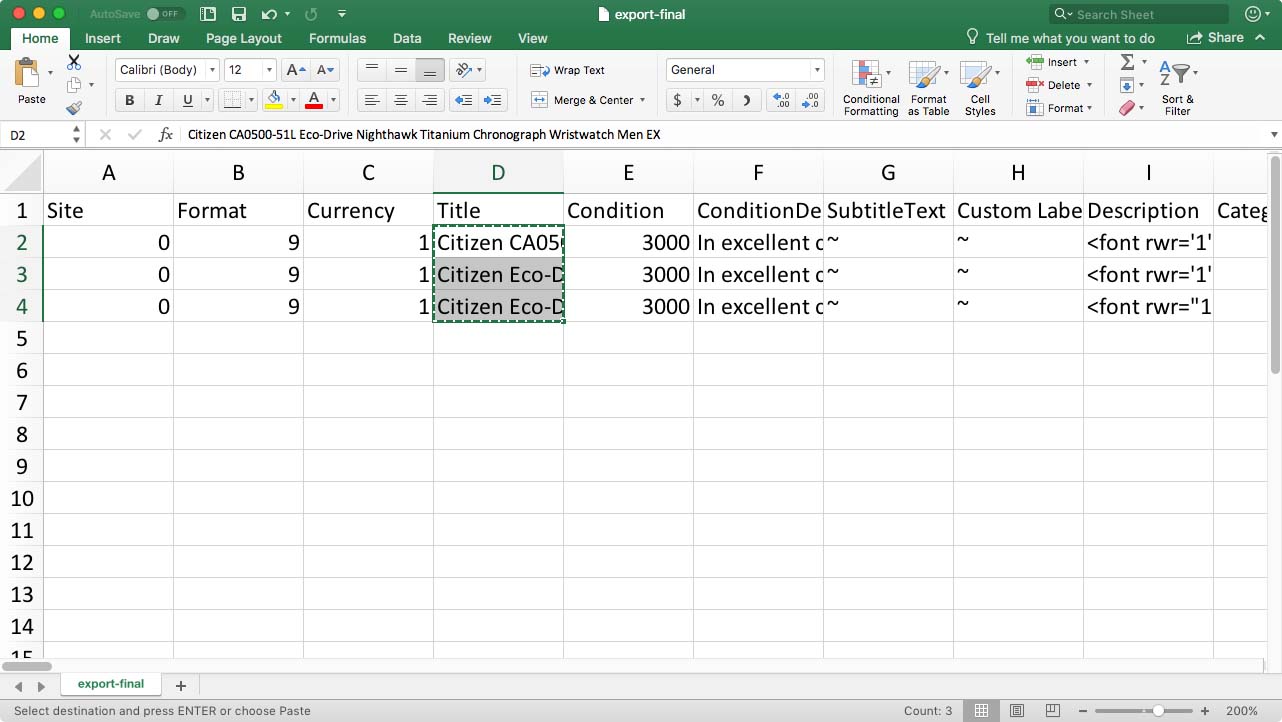
There are a lot of columns in the Turbo Lister file. Find those listed below and copy them to inkFrog's CSV template.
Copy Turbo Lister "Title" data to the inkFrog "title" column. Copy all of the data (except the header) from the Turbo Lister "Title" column to the column labeled "title" in the inkFrog CSV template.
Copy "Description" data to the "description" column. Copy the data from the Turbo Lister "Description" column to the column labeled "description" in the inkFrog CSV template.
Copy "Quantity" data to the "quantity" column. Copy the data from the Turbo Lister "Quantity" column to the column labeled "quantity" in the inkFrog CSV template.
Copy "Starting Price" data to the "price" column. Copy the data from the Turbo Lister "Starting Price" column to the column labeled "price" in the inkFrog CSV template.
Copy "PhotoOneURL" data to the "images" column. Copy the data from the Turbo Lister "PhotoOneURL" column to the column labeled "images" in the inkFrog CSV template.
Copy data from either "UPC" or "EPID" to the "product_identifier" column. Depending on whether you use UPC or EPID numbers for your eBay products, copy either the UPC or EPID column data to the column labeled "product_identifier" in the inkFrog CSV template.
Whew! Glad that's done. Remember as you copy not to change the headers or the order of the columns in the inkFrog template.
Now, save the inkFrog CSV file template containing the data copied from your Turbo Lister export file.
3. Upload the CSV File
Now it's time to import the CSV file you just created into inkFrog as new listings. Don't worry—these won't go live on eBay unless you specifically push them live later. Right now we're just going to create them in your inkFrog library.
If you're not already logged in to inkFrog, log in now, then follow these steps:
Open your listings library. Click "Listings" → "Library" to open your inkFrog listings library.
Click "Import" → "From CSV" to start the import tool. The "Import" option is located at the upper-right of your inkFrog window.

Click "Import" → "From CSV" in your listings library to start the import process.
Click "Choose File" and select your CSV file. Click the "Choose File" button, then browse to the saved copy of the inkFrog CSV template that you just filled with Turbo Lister data.
Click "Upload" then "Start Import" to import listings. After you click "Upload" to begin, inkFrog will tell you how many listings it thinks it has found in the CSV file you created. If the number seems right, click "Start Import" to actually begin importing listings. A progress bar will be displayed as data is being imported.
Select the listings to create. Now you're shown a list of all the listings that inkFrog found in your CSV file. Select each listing that you'd like to create, or click the check box in the header row to select all of the listings found in the file. Click "Next" when your selections are made.
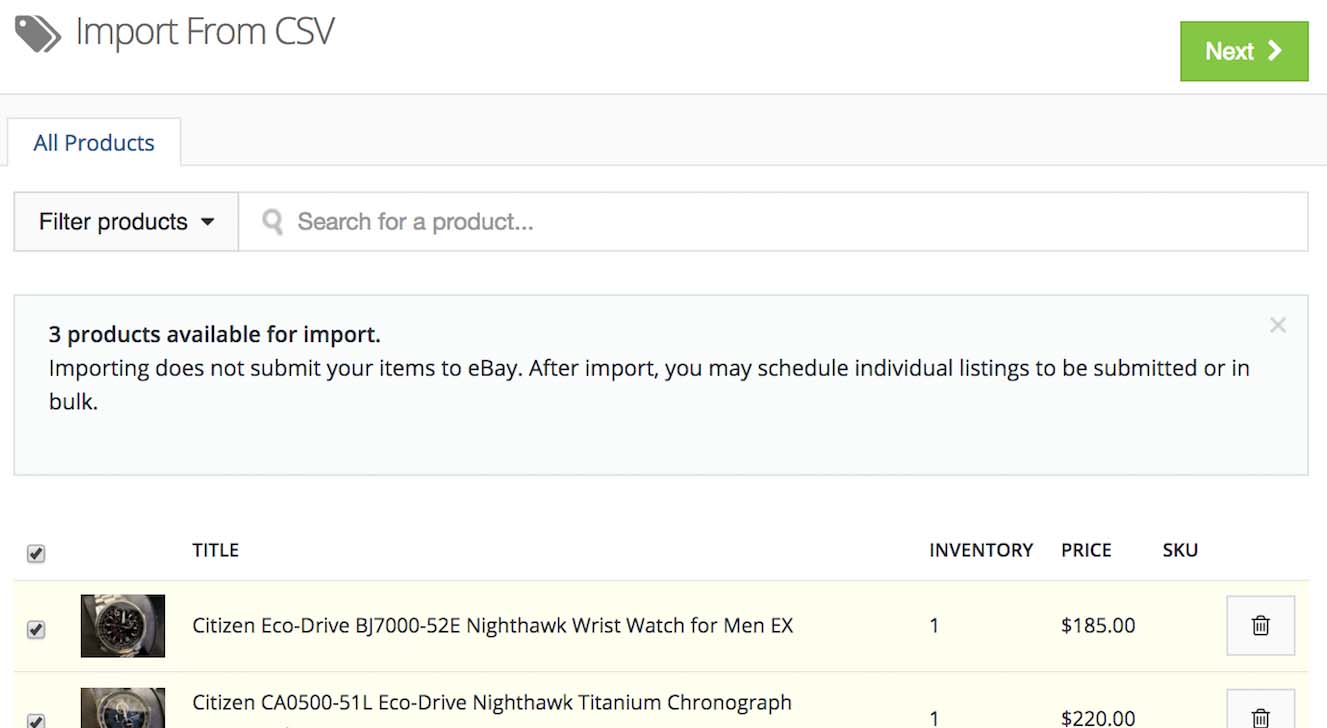
Select the listings you'd like to create, then click "Next" to continue.
4. Select or Create Profiles for Each Listing
After another brief progress bar is displayed, you'll be shown a long list of your newly imported listings.
Go through each of these listings, following these steps in each case:
Choose to create a listing or map to a listing. Since your goal here is to import data from Turbo Lister, in most cases you'll want to create a new listing—and this tab should generally be selected for you. You may opt to map a Turbo Lister listing to an existing inkFrog listing, however, if in some cases you want to overwrite the data in your inkFrog library with the data from a Turbo Lister listing.
Select profiles or create new profiles. For each listing, select an existing inkFrog listing, shipping, return, or payment profile if you already have one that's appropriate for the listing, or click the "plus" icon next to each option to create a new profile on the fly.
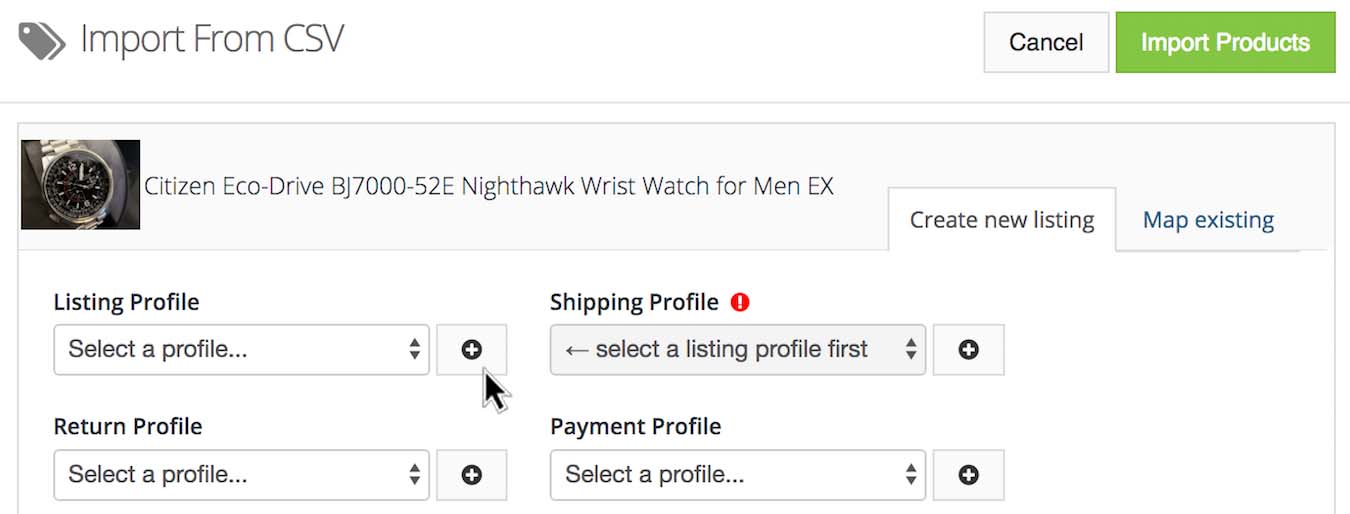
For each listing, either select existing listing, shipping, return, and payment profiles or create new ones.
Once you've selected or created profiles for each of the listings shown, click the "Import Products" button to have inkFrog create new listings in your library for each old Turbo Lister item.
Again, don't worry about this step—these listings won't go live on eBay; they're just being created in your inkFrog listings library.
5. Add More Data to Each Listing and Organize
Now it's time for more cleanup work.
The listings you've imported from Turbo Lister are now in inkFrog, but you may still wish to perform additional maintenance work:
Organizing your newly imported listings into inkFrog folders
Updating profiles or customizing listings that don't precisely match your profiles
Adding new images, since only one image for each Turbo Lister item is made available when Turbo lister exports data
Yes, this can be a time consuming step, but in most cases you've still saved a ton of time by exporting from Turbo Lister, then importing into inkFrog—particularly if you have hundreds or thousands of listings with hand-crafted item descriptions.
Repeat as Necessary and For More Information
Now you've imported your first batch of up to 250 Turbo Lister listings into inkFrog.
If you have more listings in other Turbo Lister folders, repeat the process—and keep doing so until your entire Turbo Lister library has been moved to inkFrog.
Then, breathe a sigh of relief that you've finally taken that step you've been meaning to take for years now—and moved your library of old listings from an old tool—Turbo Lister—that's scheduled to disappear forever in just a few weeks into a new tool—inkFrog—that'll be around for as long as e-commerce happens.
Join the Newsletter
Get started for free today!
Try it free
Join the 200,000+
using inkFrog!


