If you're a cautious lister, you'd probably like to have some idea of what's going to happen and what shoppers are going to see the moment you click the "Save to library & launch" button in inkFrog.
Even more importantly, you'd probably like to know, when you've scheduled a listing for the future, what's going to happen when inkFrog tries to push it live on eBay.
What if there's a glitch in the template you've just created and it looks odd?
What if your item description reads a lot longer than you thought it would?
What if you've forgotten an important listing detail?
If you've never noticed or used the "Preview" button on inkFrog's listing form, it's time to test-drive it. The preview button enables you to:
See how your item description will look in the template you've selected.
Check your listing data for any errors that may prevent it from going live successfully.
See a fee-table-driven estimate of the basic (before promotions) listing fees for the listing.
Let's take a deeper look at these options now.
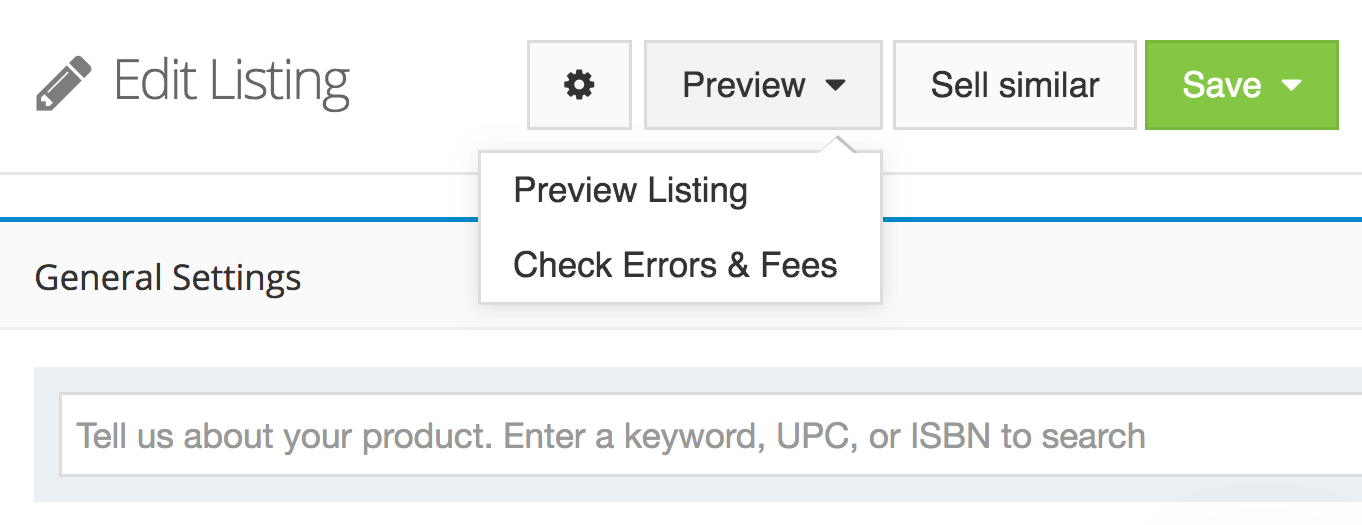
Use the "Preview" menu to check your work before listing or scheduling.
The "Preview Listing" Tool
Select "Preview Listing" to see:
How the title, item description, and images you've entered in the form...
...will look when inserted into the template you've selected for the listing.
This is a great tool for catching unexpected glitches that happen, often because text is longer than expected, images don't appear in the order expected, or other similar foibles that you might not otherwise catch before a listing goes live.
The tool's operation is simple—you opt to preview the listing and a new pop-up window is opened showing just the portion of the listing and template that shoppers will see in the item description area.

Use "Preview Listing" to check your title, description, and images in your chosen template.
If you see something you don't like, close the preview and either edit your listing or edit your template.
If all looks well, close the preview comfortable in the knowledge that your listing looks great.
The "Check Errors & Fees" Tool
This tool has two uses. The first is to catch listing form errors—for example, times at which you've forgotten to enter a listing detail or entered some combination of listing details that is forbidden by eBay or that doesn't quite make sense.
To use the tool, fill out the listing form completely until you believe you're finished and ready to list. Then select "Check Errors & Fees" from the Preview menu.
If there are problems with your listing, you'll see a pop-up with a red area of text showing the errors that inkFrog detected, something like this:
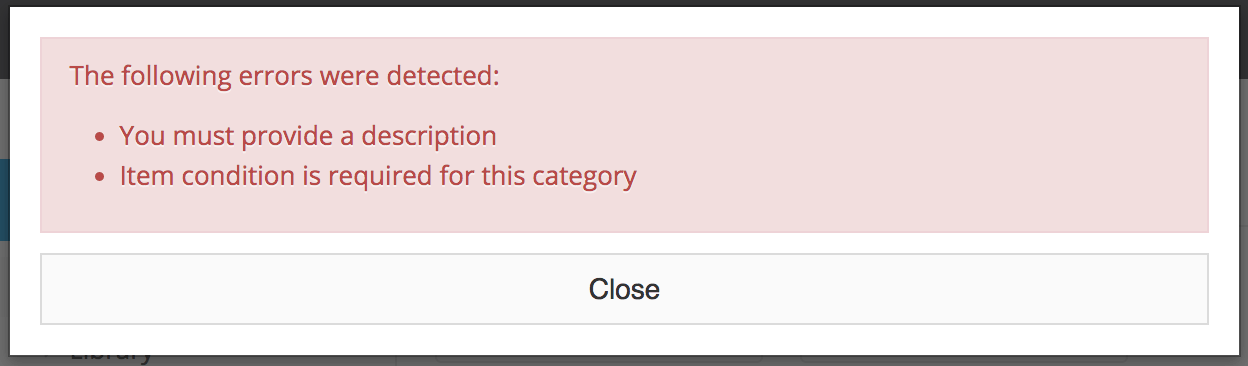
If there are problems or inconsistencies in your listing, inkFrog tells you what they are.
If the check finds errors, make a note of what they are, then click "Close." Go back through the form and rectify them, then re-check when done.
If no errors are detected, inkFrog will instead use eBay's most recent fee tables to estimate the basic (prior to any promotions) cost of this listing in insertion fees, and will show you the total in question:
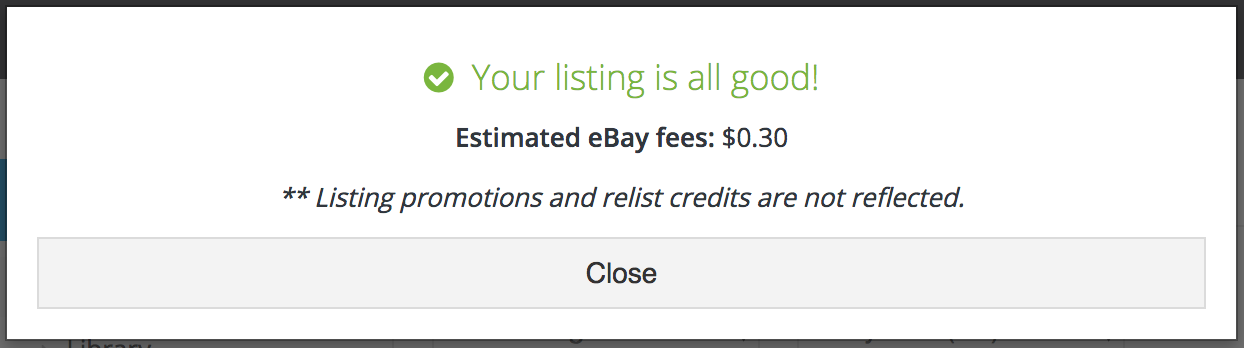
If there are problems or inconsistencies in your listing, inkFrog tells you what they are.
This rough estimate of fees acts as a good sanity check—have you entered the price correctly, or did you enter an extra digit (or omit a required digit) as you typed? Did you select the right category for this product?
If you've made these kinds of ham-fisted mistakes, you'll soon be able to spot them easily using inkFrog's estimate.
Simple But Useful
The tools in the "Preview" menu are simple but useful, enabling you to quickly perform sanity checks on your inkFrog listings before you push them live or schedule them to go live.
They're not fancy, but they're not meant to be. They're simple, efficient, and they can help you to avoid nasty surprises with your listings.
Share this article:


Join the Newsletter
Get started for free today!
Try it free
Join the 200,000+
using inkFrog!